Learning how to schedule Instagram posts is one of the best productivity hacks for busy creators, social media managers, and business owners today.
And the benefits of scheduled Instagram posts go far beyond just saving you time — although that sounds pretty great though, doesn’t it?
In this guide, I’ll cover the biggest advantages of scheduling Instagram posts and explain exactly how to schedule posts on Instagram to improve your posting consistency and content performance.
Why you should schedule Instagram posts
No matter what your social media goals are, there are many benefits to Instagram scheduled posts:
Scheduling Instagram posts saves you time and mental energy
Crafting and posting the perfect Instagram post can be time-consuming, especially if you’re creating your posts one-by-one on the day you plan to share them.
Scheduling Instagram posts allows you to create content in batches, instead of interrupting your workflow to post a single photo.
While it may not seem like a big deal to spend 10 minutes editing an image or reel, writing the perfect caption, and adding all the relevant hashtags, that interruption to your workday costs you.
After a disruption, it takes people an average of 25 minutes to return to their original task — turning your 10-minute Instagram post into a 35-minute exercise.
Plus, multitasking is bad for your brain. Switching between tasks strains your mind and temporarily lowers your IQ up to 10 points. With all that added mental stress, you’ll have a hard time coming up with a creative caption for your content.
By spending an hour or two creating and scheduling your posts for the week ahead, you can save a ton of time and maintain consistent quality across the board.
Scheduling ensures you post consistently
There is one thing I recommend above all else to aspiring creators and those hoping for social media success: consistency.
Sure, using the right hashtags and posting at the right time can give your content a nice little algorithmic boost, but — apart from creating high-quality content that resonates with your target audience — there is nothing that just works the way consistency does. And that applies to your content across platforms, not just Instagram posts.
When you’re consistently and frequently publishing new content, your audience will learn what to expect from you and when it’ll be posted.
For example, Emma Ward, marketing manager for the New England smoothie bar The Juicery, schedules content when her brand’s products are most relevant to its followers’ daily schedules.
She’s found that the best time to post about smoothies and other menu items is first thing in the morning — around 7:30 a.m. every weekday and just past 8 a.m. on the weekends, even if the number of followers online is smaller.

Keeping a consistent schedule helps you maximize engagement without hitting any lulls or stretches without updates.
Scheduling gives you better control over your Instagram content
Sharing Instagram posts in the moment is fine, every so often, but it’s much easier to stay organized if you schedule Instagram posts ahead of time.
Instagram is a visual platform, and your brand’s visual impact (personal or business) goes beyond a single post. Successful Instagrammers often have a consistent look and feel — and their Instagram feeds reflect it.
When you schedule posts for Instagram, you can plan out the order of upcoming posts and envision how they’ll look in your grid. Doing so helps you avoid sharing similar posts back-to-back. Plus, you can make sure time-sensitive content goes out at just the right time.
Scheduling enables you to plan and post to Instagram from your desktop
Most Instagram scheduler tools, Buffer included, enable you to create your posts on your desktop before publishing on mobile. Smartphones are awesome tools for creating content, but they don’t give you the features or control that a desktop Instagram scheduling tool can.
With Buffer you can visually plan and schedule your Instagram Stories on web or mobile. When the time comes to post, Buffer will send you a mobile notification with everything you need to share the Story to Instagram.
How to schedule Instagram posts
In this guide, I’ll unpack two ways to schedule Instagram posts in advance. Well, 2.5 ways, if we’re splitting hairs:
1. Schedule natively on Instagram
2. Schedule Instagram posts with Buffer auto publish
2.5. Schedule Instagram posts with Buffer notification publishing
Let’s get into it:
How to schedule posts on Instagram
Did you know scheduling Instagram posts right in the Instagram app is possible? It’s a pretty handy option, if a little tricky to find. It’s also worth mentioning that going this route does come with a couple of drawbacks worth being aware of:
- You can’t crosspost outside Meta: Crossposting (sharing on multiple platforms simultaneously) is possible, but only for Meta’s own platforms. That is, Instagram, Threads, and Facebook.
- You can’t schedule Instagram Stories: That means only Instagram feed posts (images and reels) can be scheduled. This might not be a big deal for creators (it’s nice to keep stories spontaneous, after all), but for social media marketers who want to be prepared for a big launch or another important date, this could pose problems.
- You can’t schedule more than a month in advance: A bit of a bummer if you’re a prolific content batcher or a social media manager. It’s worth noting that Instagram’s documentation specifies 75 days, but I’ve been unable to schedule posts more than 28 days ahead. This might be a bug that is fixed by the time you’re reading this, though!
If these are dealbreakers for you, skip right on down to Buffer scheduling options (you can schedule Instagram posts and stories on our free plan, too!).
Now, before you’re able to schedule a post on Instagram, you’ll need to make sure you have a professional Instagram account (that is, an Instagram Creator or Instagram business account). Here’s how to switch yours.
Great, now that’s out of the way, here’s how to schedule Instagram posts.
- Tap the create post ‘+’ button at the bottom center of the Instagram app to start a new post. Choose your media, then tap ‘Next.‘
- Edit your video (if posting an Instagram Reel), and add text, stickers, and more elements by tapping the buttons at the top of your screen.
- Write your caption, and add hashtags, collaborators, location, and any other necessary details to your post. When you’re happy, scroll down to tap the ‘More options’ button.
- Toggle ‘Schedule this reel’ on.
- Choose your desire date and time for the Instagram post to be published, then tap ‘Done.’
- Tap the back arrow to go back to the post composer.
- When you’re happy with your Instagram post, tap ‘Schedule.’ And voila! Your post will be automatically published at your chosen time.
How to edit or delete a scheduled Instagram post on Instagram
Here’s a bonus step-by-step guide to making changes to any scheduled posts on Instagram:
- Tap your profile picture to head over to your page, then tap the ‘Settings and activity’ menu icon on the top right (the three horizontal lines).
- Tap ‘Scheduled content.’
- Here, you’ll find a list of the Instagram content you have scheduled. Tap on the one you want to edit.
- Tap on the three dots on the top right-hand side of the post.
- In this menu, you’ll have the option to delete, edit, and reschedule your post, or even post it right away by tapping ‘Share now.’
How to schedule Instagram posts, stories, and reels with Buffer
If you’re looking for a slightly more advanced, feature-rich scheduling route, a social media management tool like Buffer can help. With Buffer, you can schedule Instagram feed posts (image and carousel posts), reels, and stories.
Before you start:
Here are some things to get sorted before you’re able to start scheduling posts on Instagram (and beyond!) with Buffer. Don’t worry, you’ll only have to do the below once, and it won’t take more than a few minutes.
- Switch to a professional Instagram account: If you don’t have a professional Instagram account already, switching it will enable Buffer to schedule posts directly to your Instagram profile. Here are some handy instructions from Facebook (you’ll need to have a Facebook Page to switch to an Instagram business profile).
- Sign up for Buffer: You have the option to try out our paid plans on a 14-day free trial, but our powerful forever-free plan will allow you to use up to three channels, Instagram included!
- Connect your Instagram account: You’ll be prompted to add a new channel as soon as you’ve signed up, but you can also add one by clicking the ‘+ New Channel’ button on the bottom left.
All set? Here comes the easy part! You have two options when it comes to scheduling Instagram posts with Buffer, as I mentioned above. You’ll follow the same steps at the start for both routes.
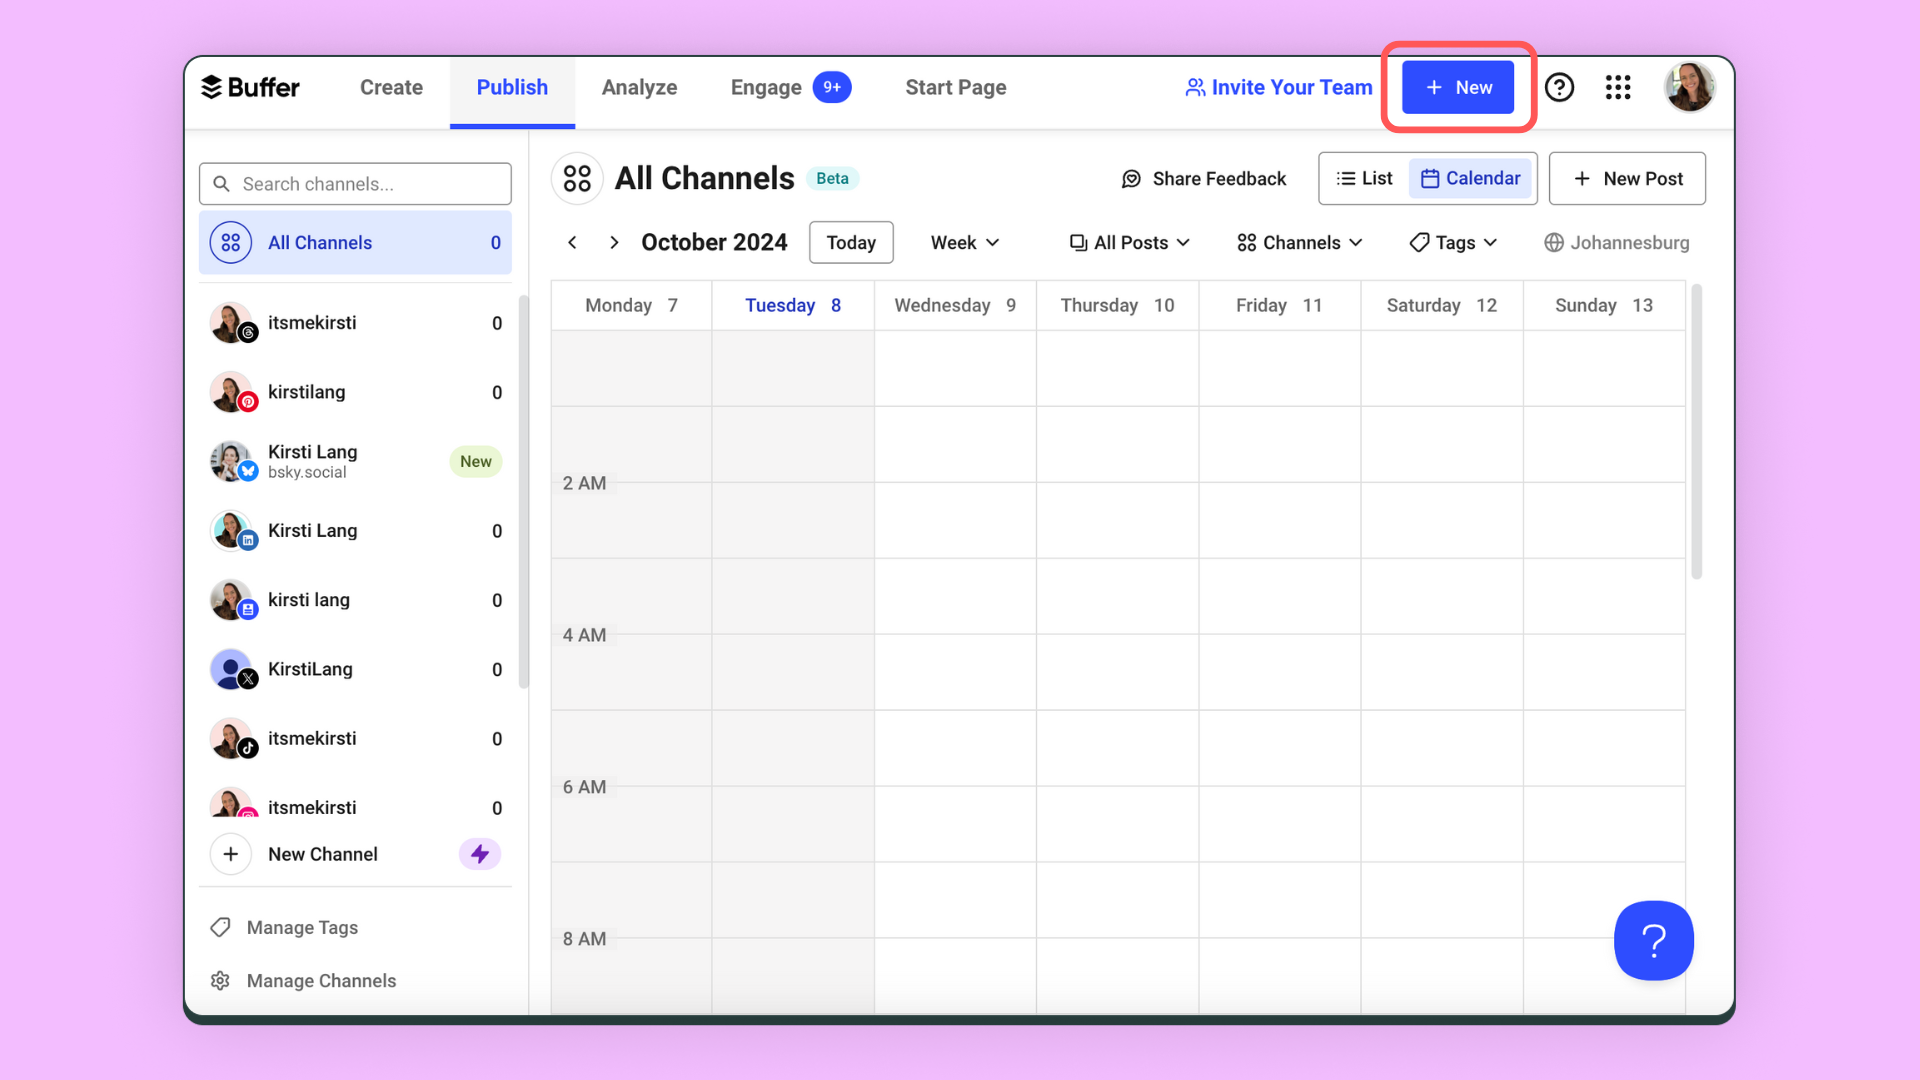
Click on the ‘+ New’ create post button on the top right-hand side of your screen, then choose ‘Post.’
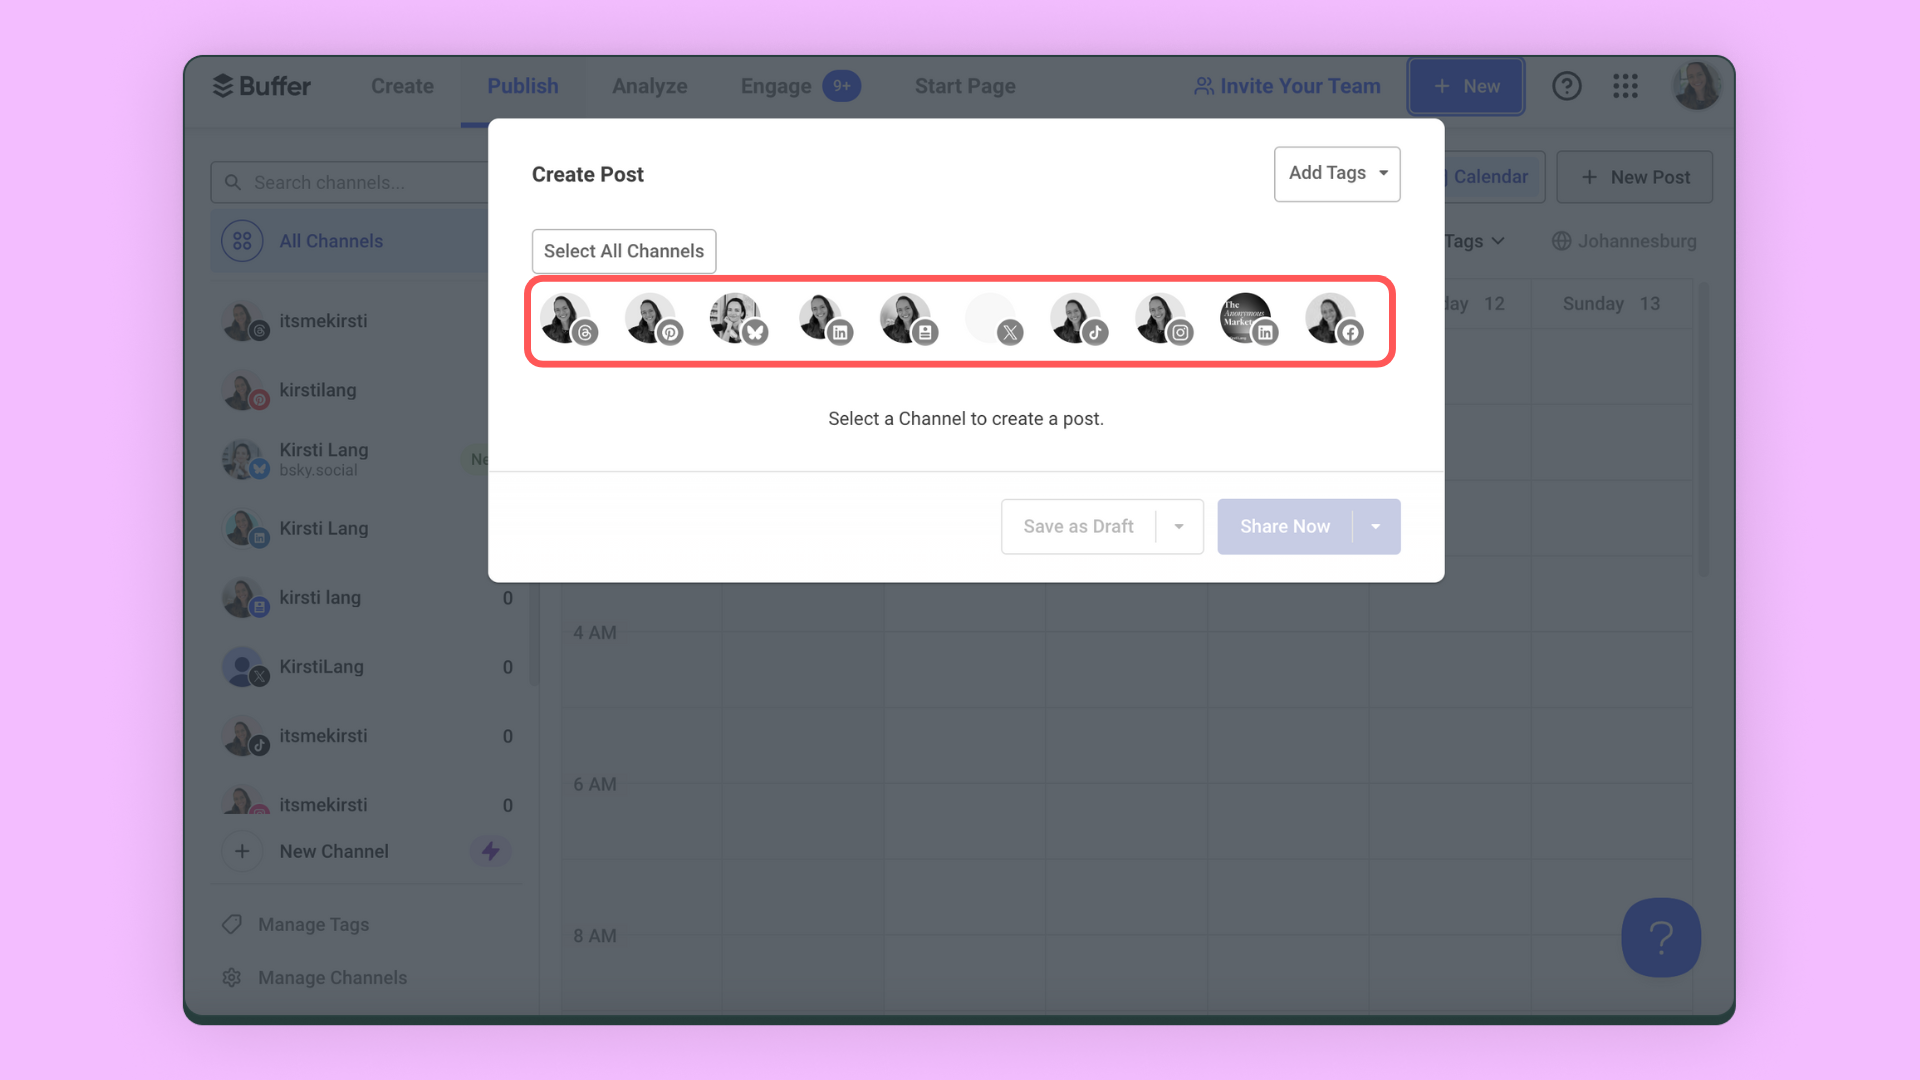
Choose Instagram from your channels list at the top of the post composer. (You can also add any other channels you have connected to cross post your content elsewhere).
Choose ‘Post,’ ‘Reel, or ‘Story, ‘ depending on what content you want to post. Upload your media and add your caption. Don’t forget the hashtags!
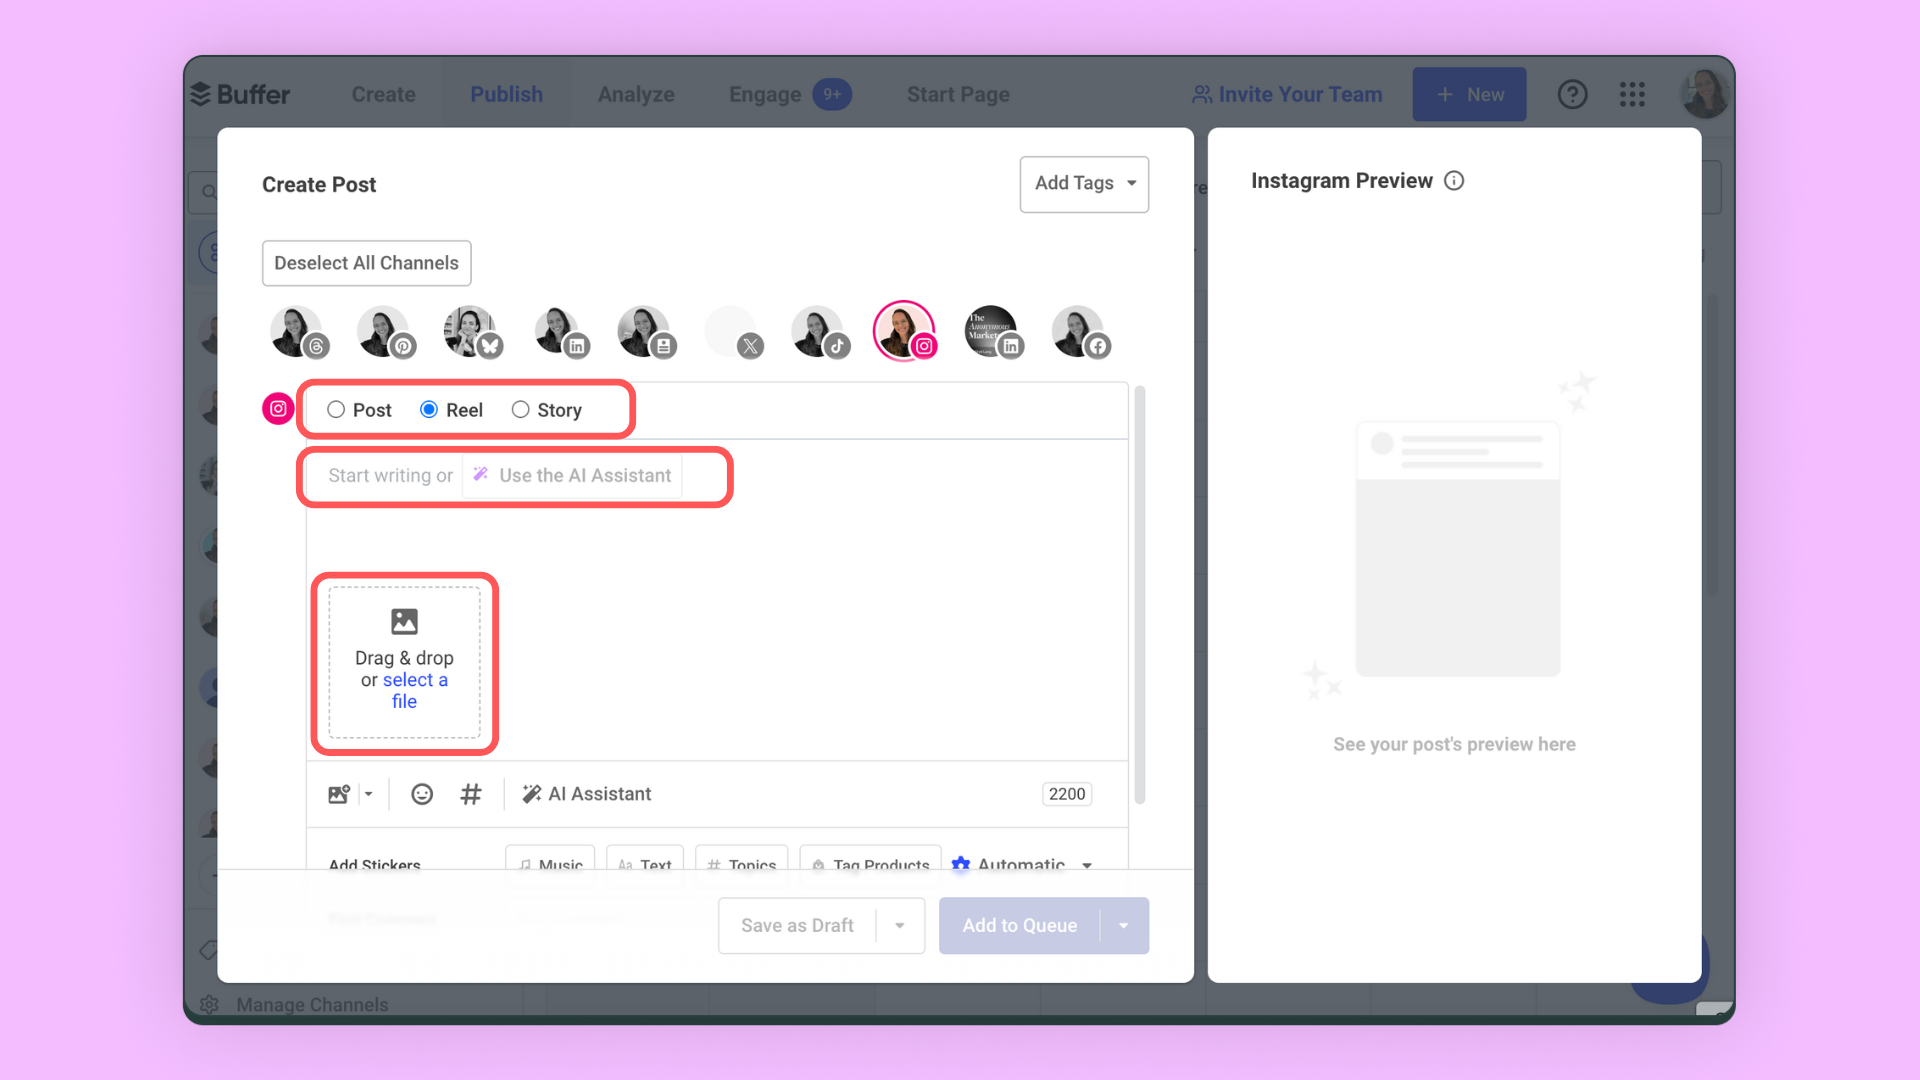
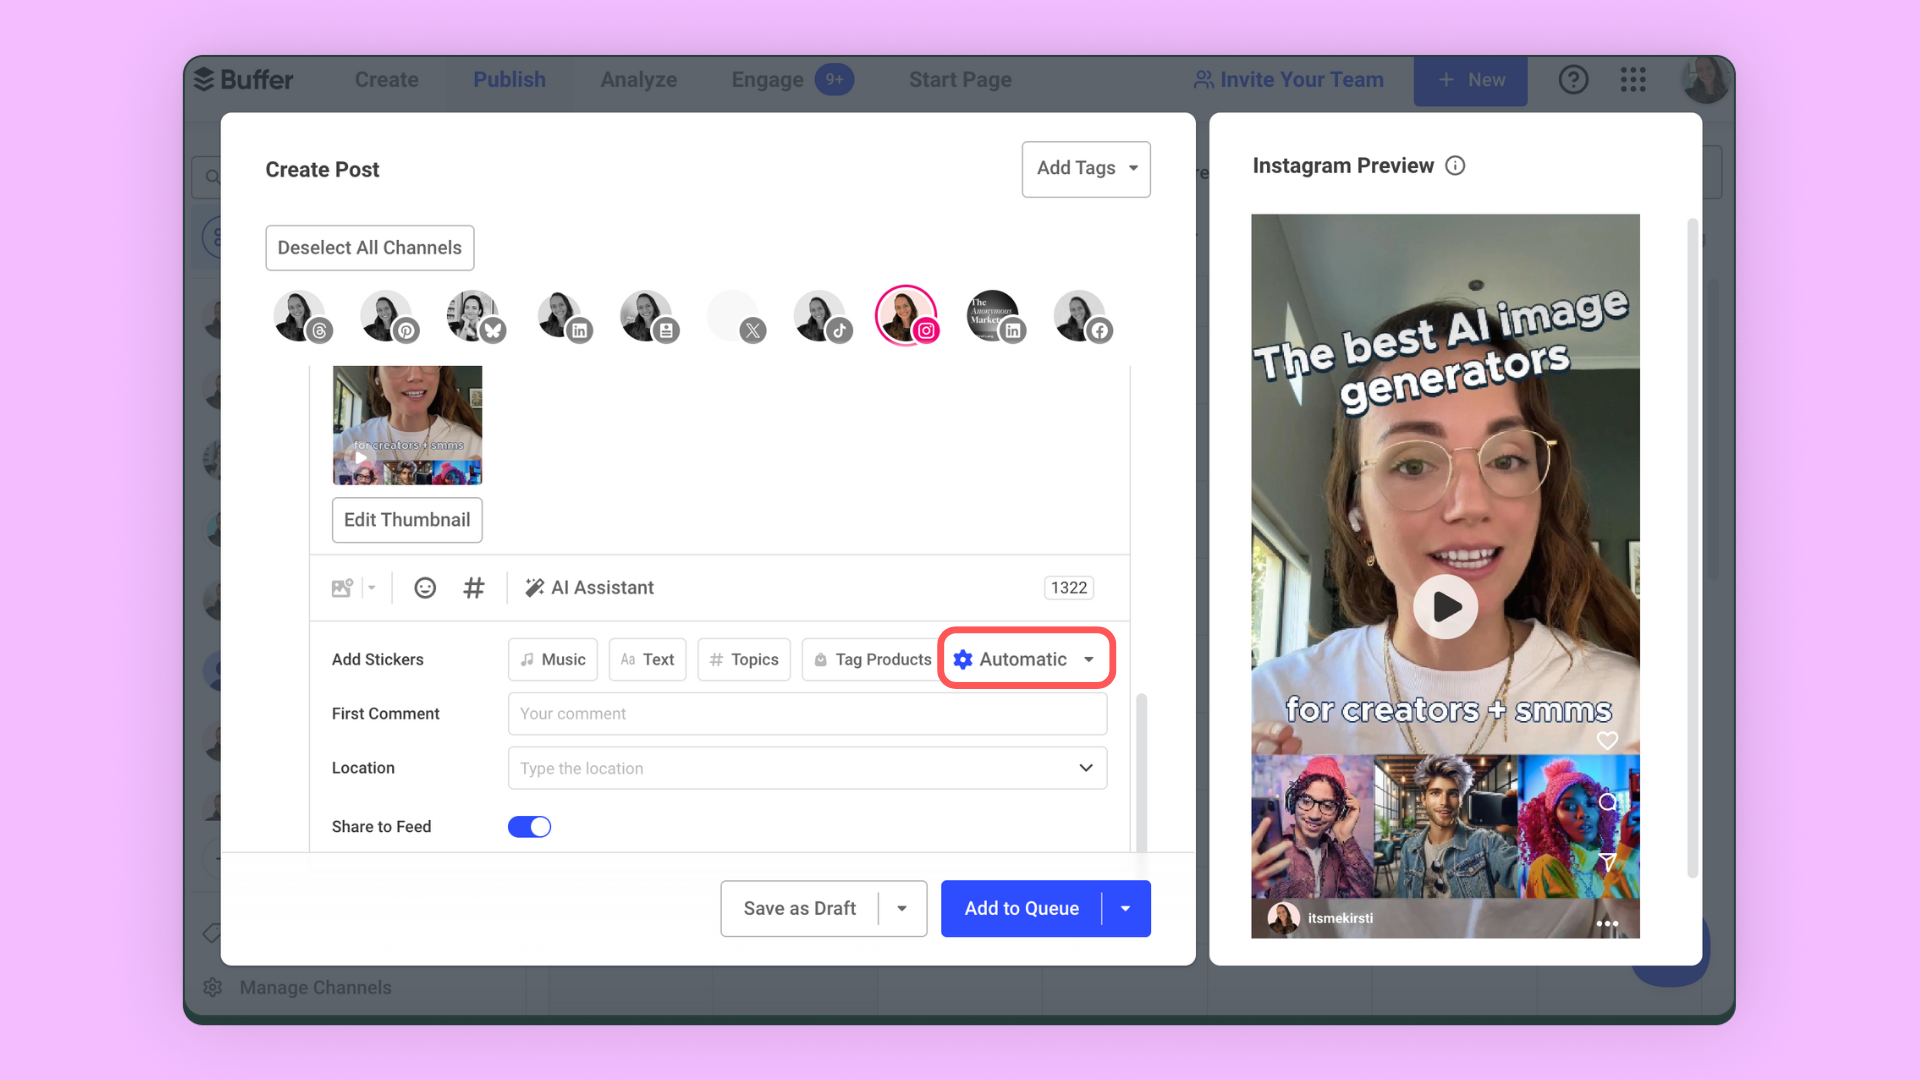
To auto publish your post at a specific time, make sure the ‘Automatic’ option is selected.
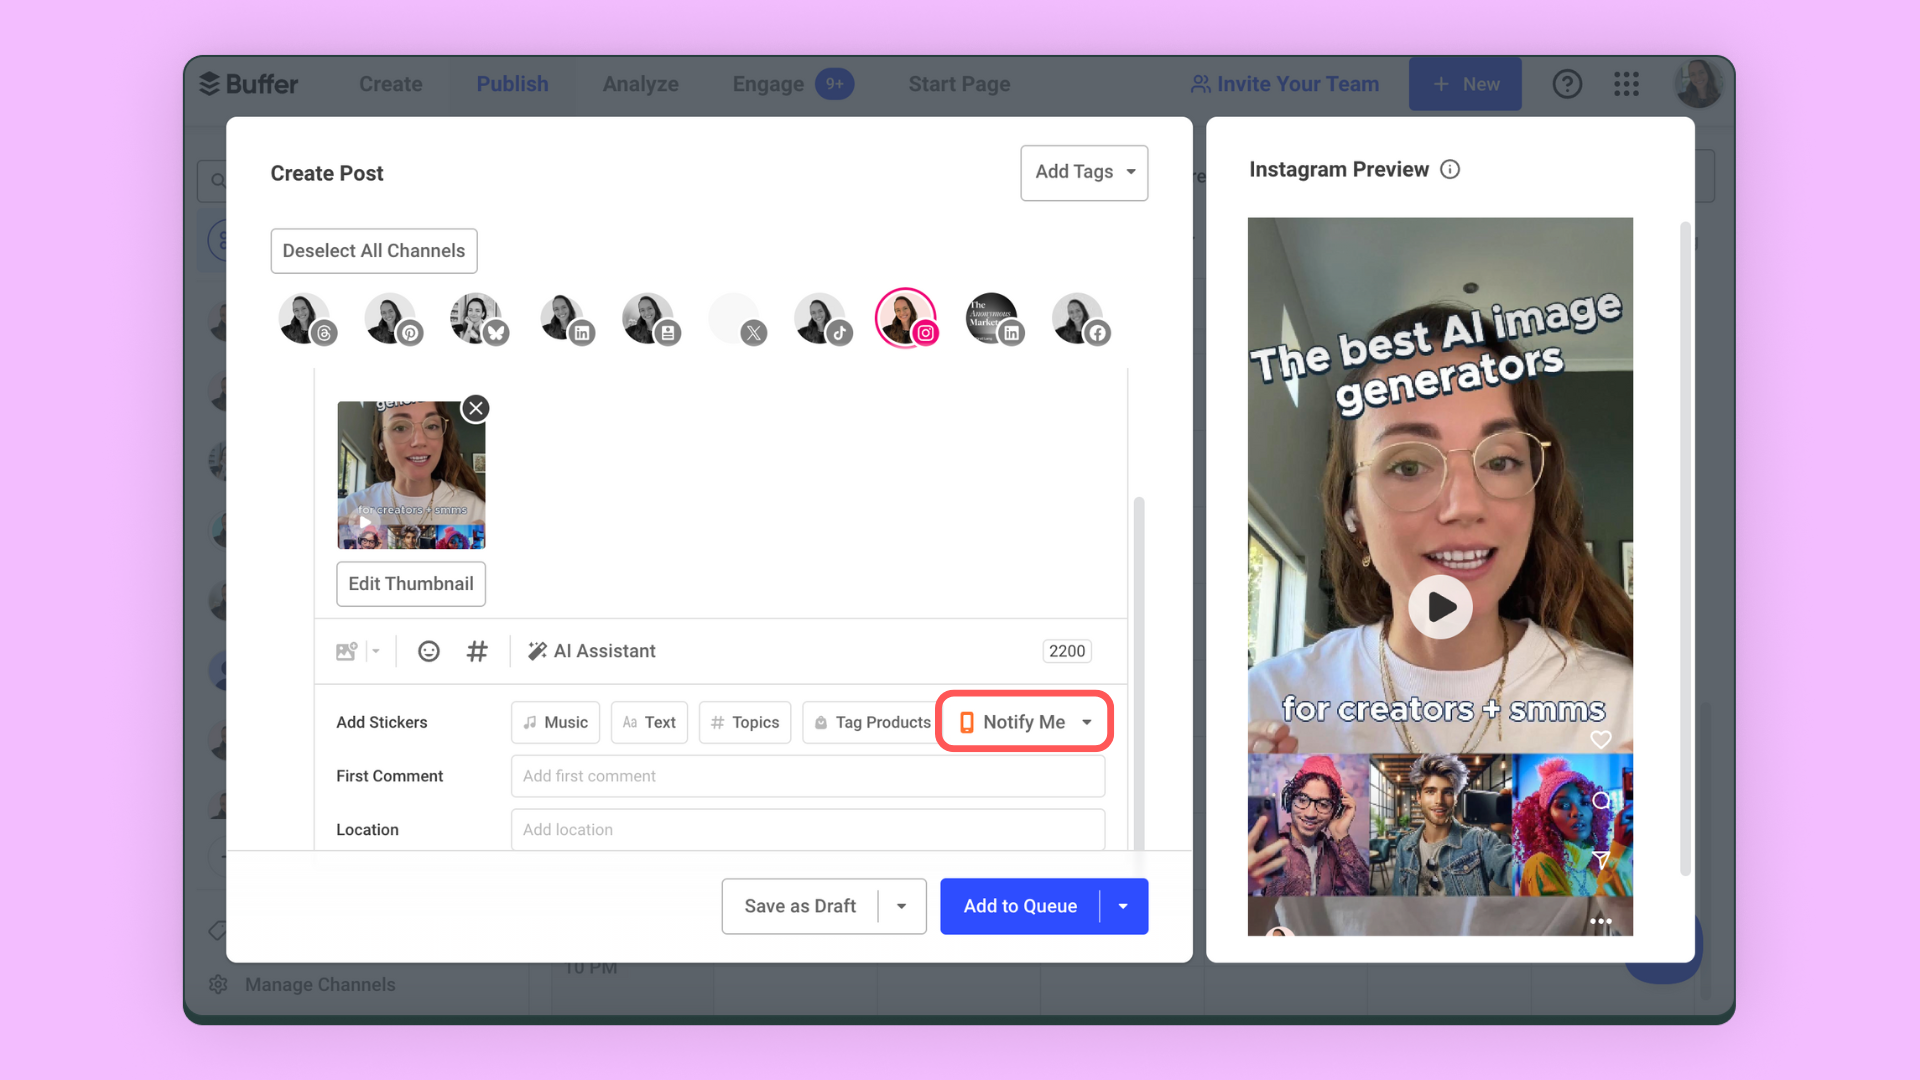
To get a notification when the time comes to post (so you can finish the post up in Instagram yourself — more on this below), choose ‘Notify Me.’
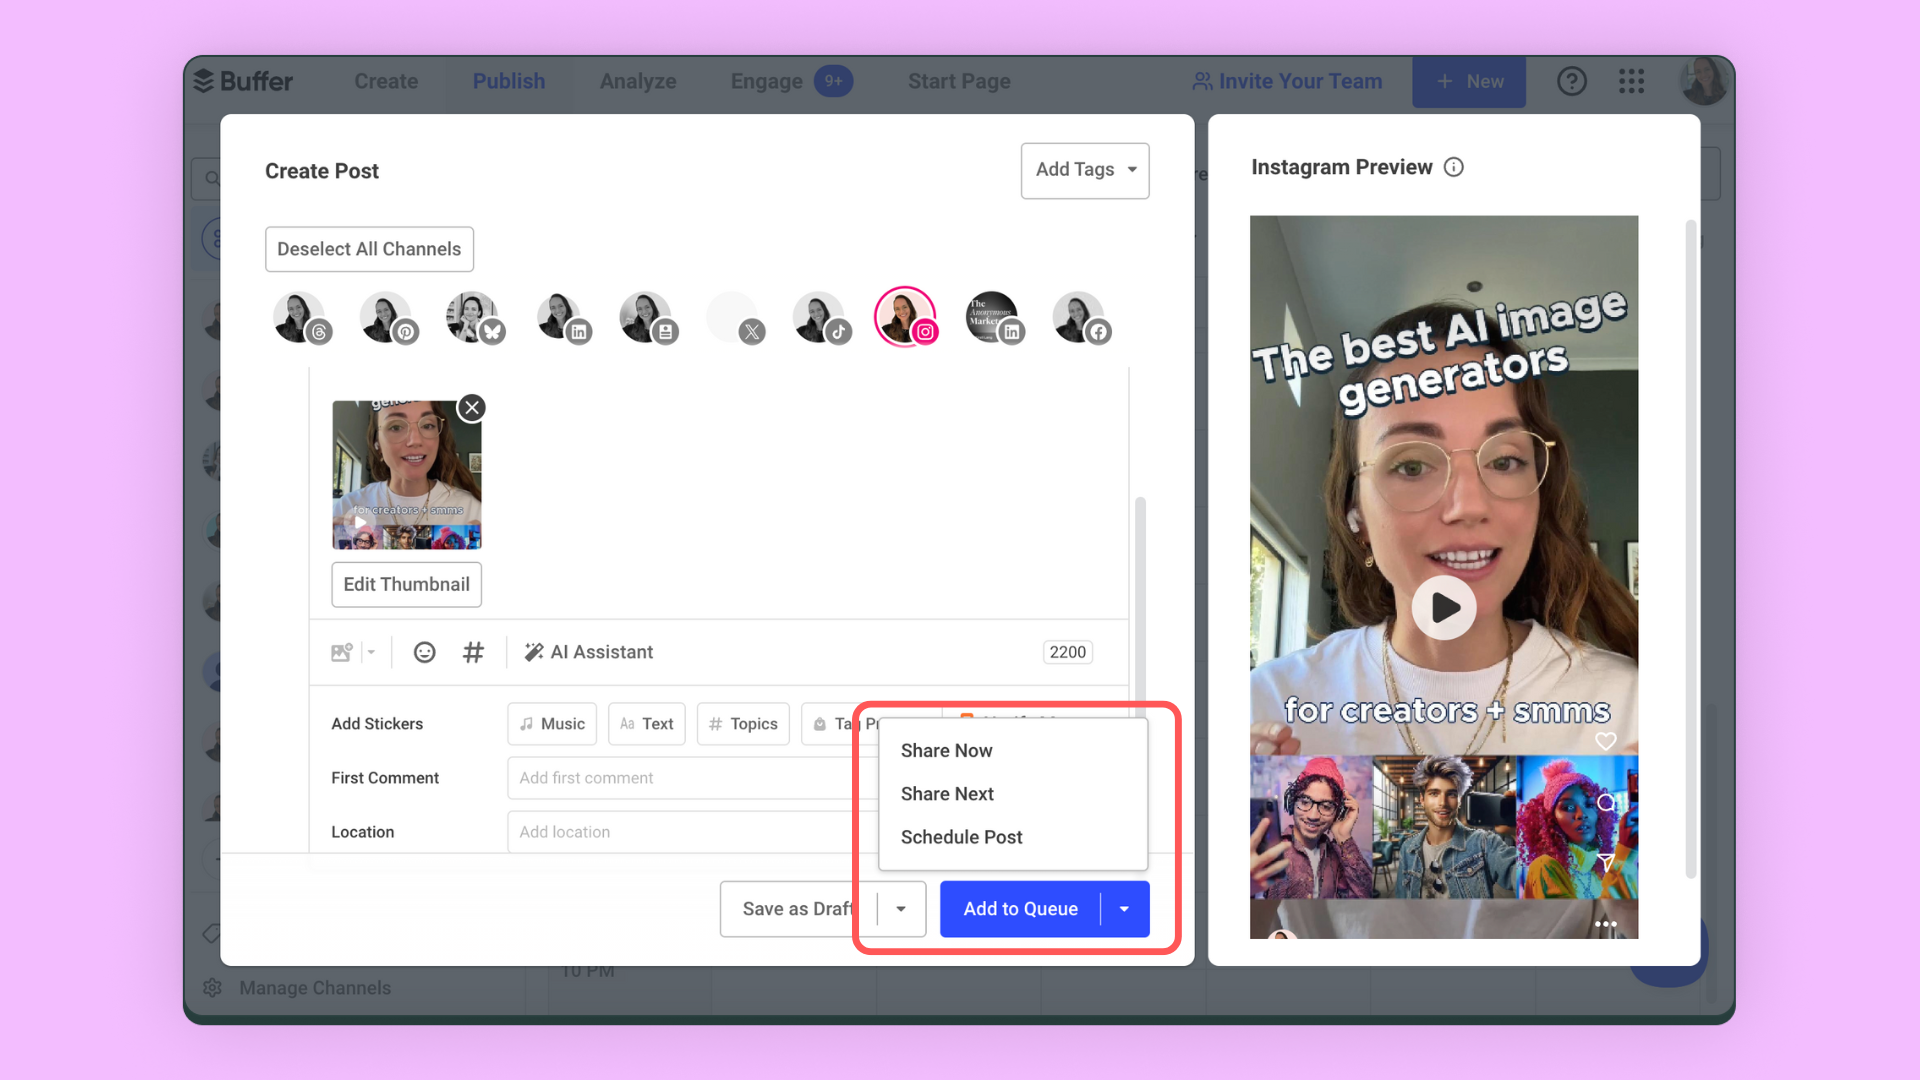
Click on ‘Add to Queue’ to post in the next available slot in your queue, ‘Share Now’ to post immediately, ‘Share Next’ to post in the next available queue slot, or ‘Schedule Post’ to select a specific time.
You’re all set! When the time comes, your content will immediately be shared to Instagram, or you’ll get a notification on your phone, complete with all the content you need to share ready and waiting for you.
Why use Instagram notification publishing?
Glad you asked! We introduced this option in Buffer to give you even more flexibility. The idea is to have your content ready and waiting to go but still be able to add the last touches that the Instagram algorithm seems to love — that is, text, stickers, and trending Instagram sounds or music.
Tapping on the Buffer notification when it pops up will allow you to automatically open your content, preloaded, in the Instagram composer and easily copy over the caption you previously wrote, as you can see below.
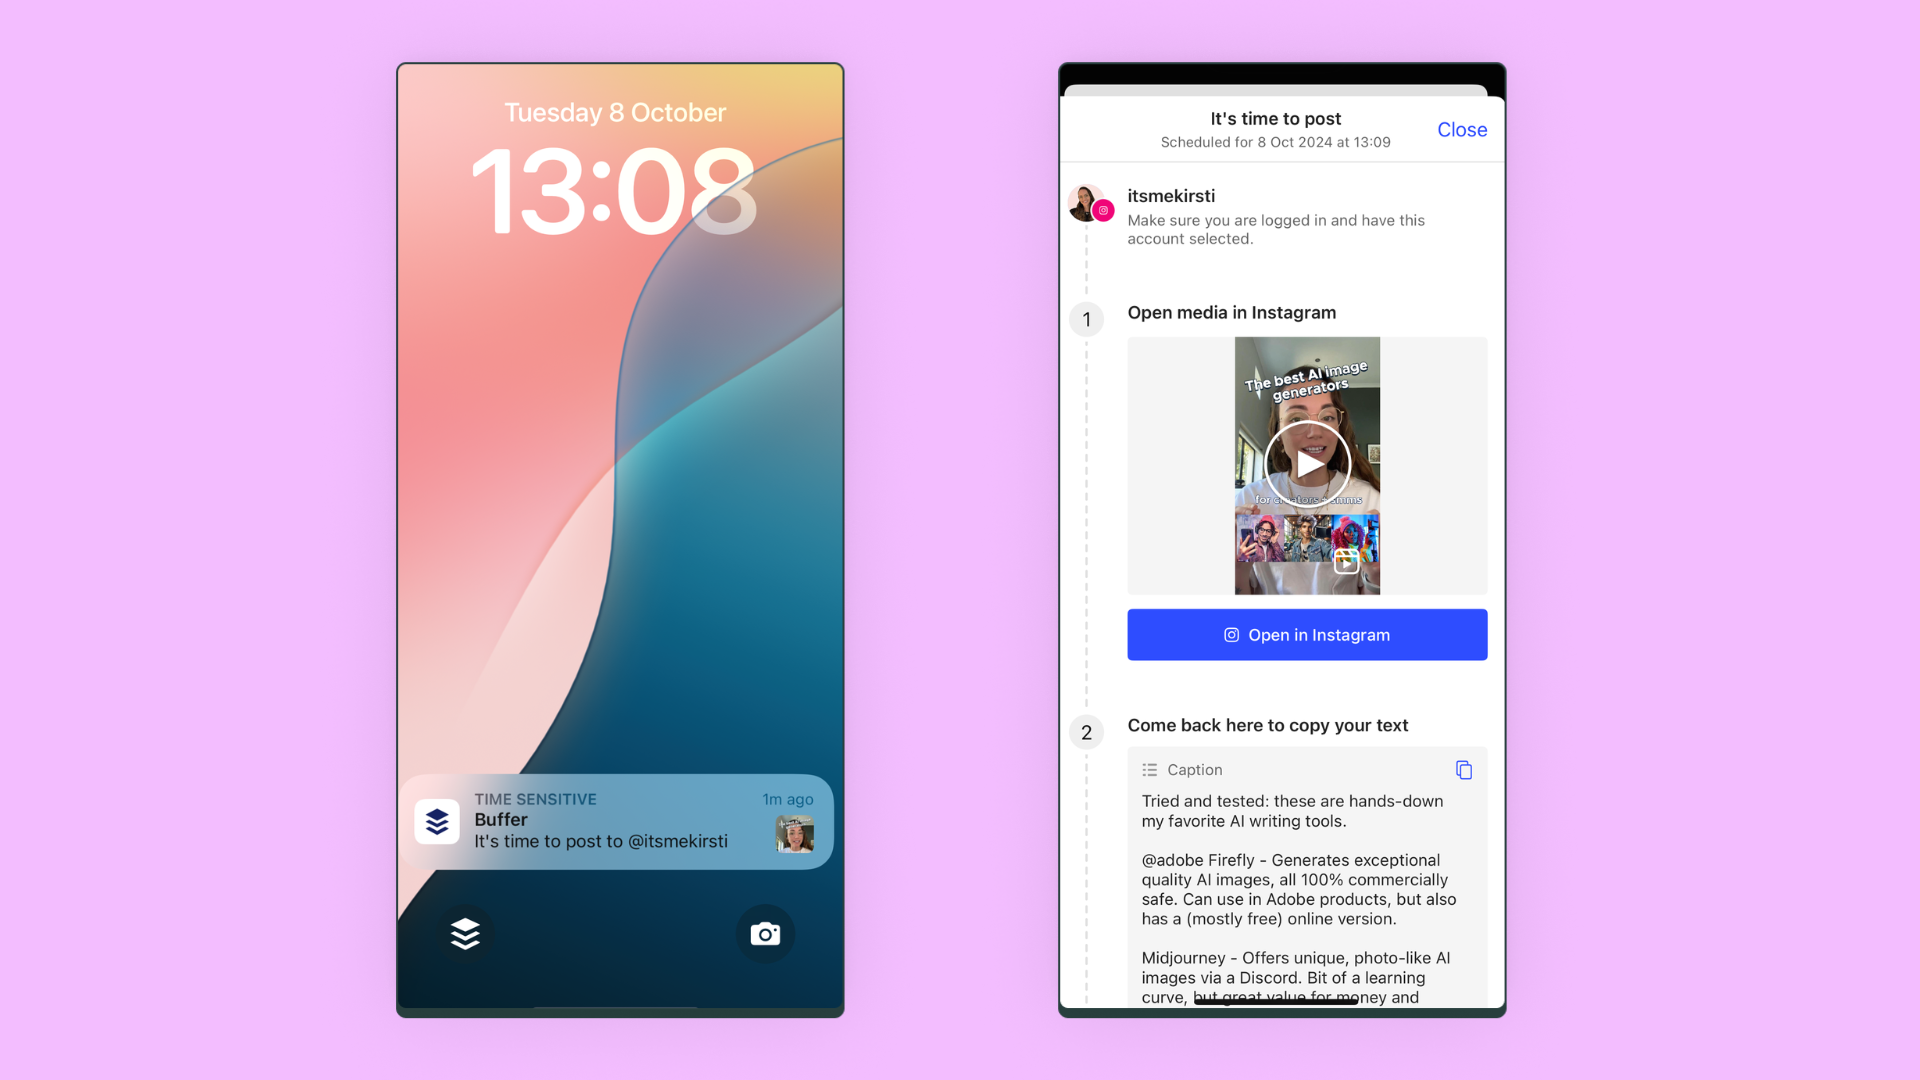
You can even add notes to your post about the text you want to overlay on the image or video, the location, topics, and even the music you plan on using.
With all that done, getting the post published will only take a few minutes — helping you work smarter, not harder, on Instagram.
More Instagram resources
Looking to grow your Instagram account? We’ve got you covered with these must-read guides:
📚 When’s the Best Time to Post on Instagram?
📚 How the Instagram Algorithm Works in 2024: New Update from CEO Adam Mosseri
📚 Instagram Image and Video Size and Dimensions in 2024 — for Posts, Stories, and Reels
📚 How to Find Trending Audio on Instagram in 2024 (+17 Tracks to Use Right Now)

